Gentle readers, I am back again with yet another tutorial that relates to the legibility of type. I love the art of map labeling, and the fact that this will be my third post on integrating type into a map suggests that I’ve probably thought way too much about it. While my two previous posts were on type knockouts, this time around, I’m going to talk about another favorite trick of mine: making type halos that appear only when needed.
Notice in the map below that there’s a faint glow around parts of the label for the Cadillac Plain. You can see it most prominently on the left side of the label. By the time you get to the right side of the label, it’s mostly gone.
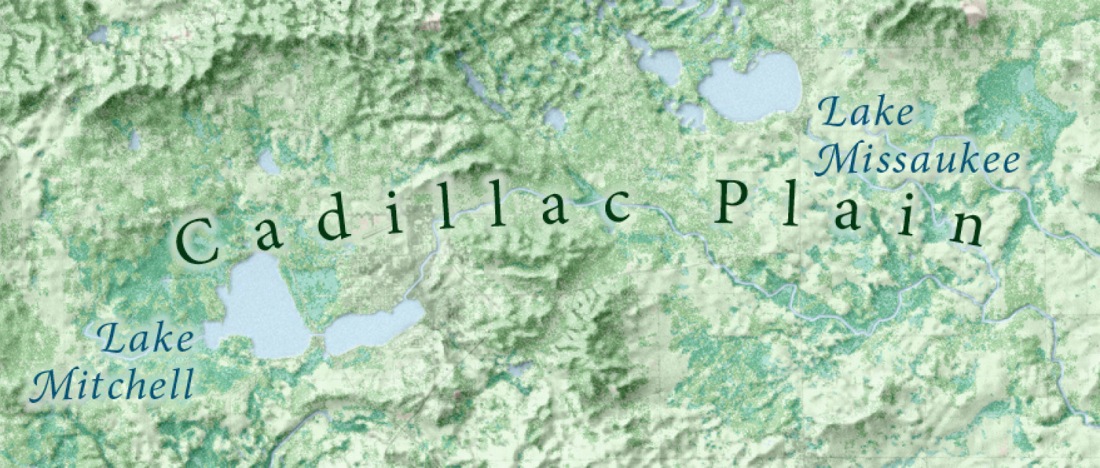
Notice what happens when I turn off the label, but leave that glowing halo. You can see that it shows up only in some areas.

Specifically, it pops up only where the underlying map is darkest, and then it gracefully fades away as the map lightens. This halo is a tool that we bring in only when it’s necessary to help the label’s legibility. When the map is light, the dark label survives fine, and a glow serves no purpose. The labels only need a boost when the underlying map is darker, since the contrast between the label and the map will be weaker. You can see the value that the glow brings by looking at how the labels appear without it.

We don’t want to overuse the glow when it’s unnecessary, since it’s covering up our map and it feels clunky when it’s used in places where it’s not needed. Compare the first image, with the glow that fades in-and-out, with a glow that doesn’t change based on its context.

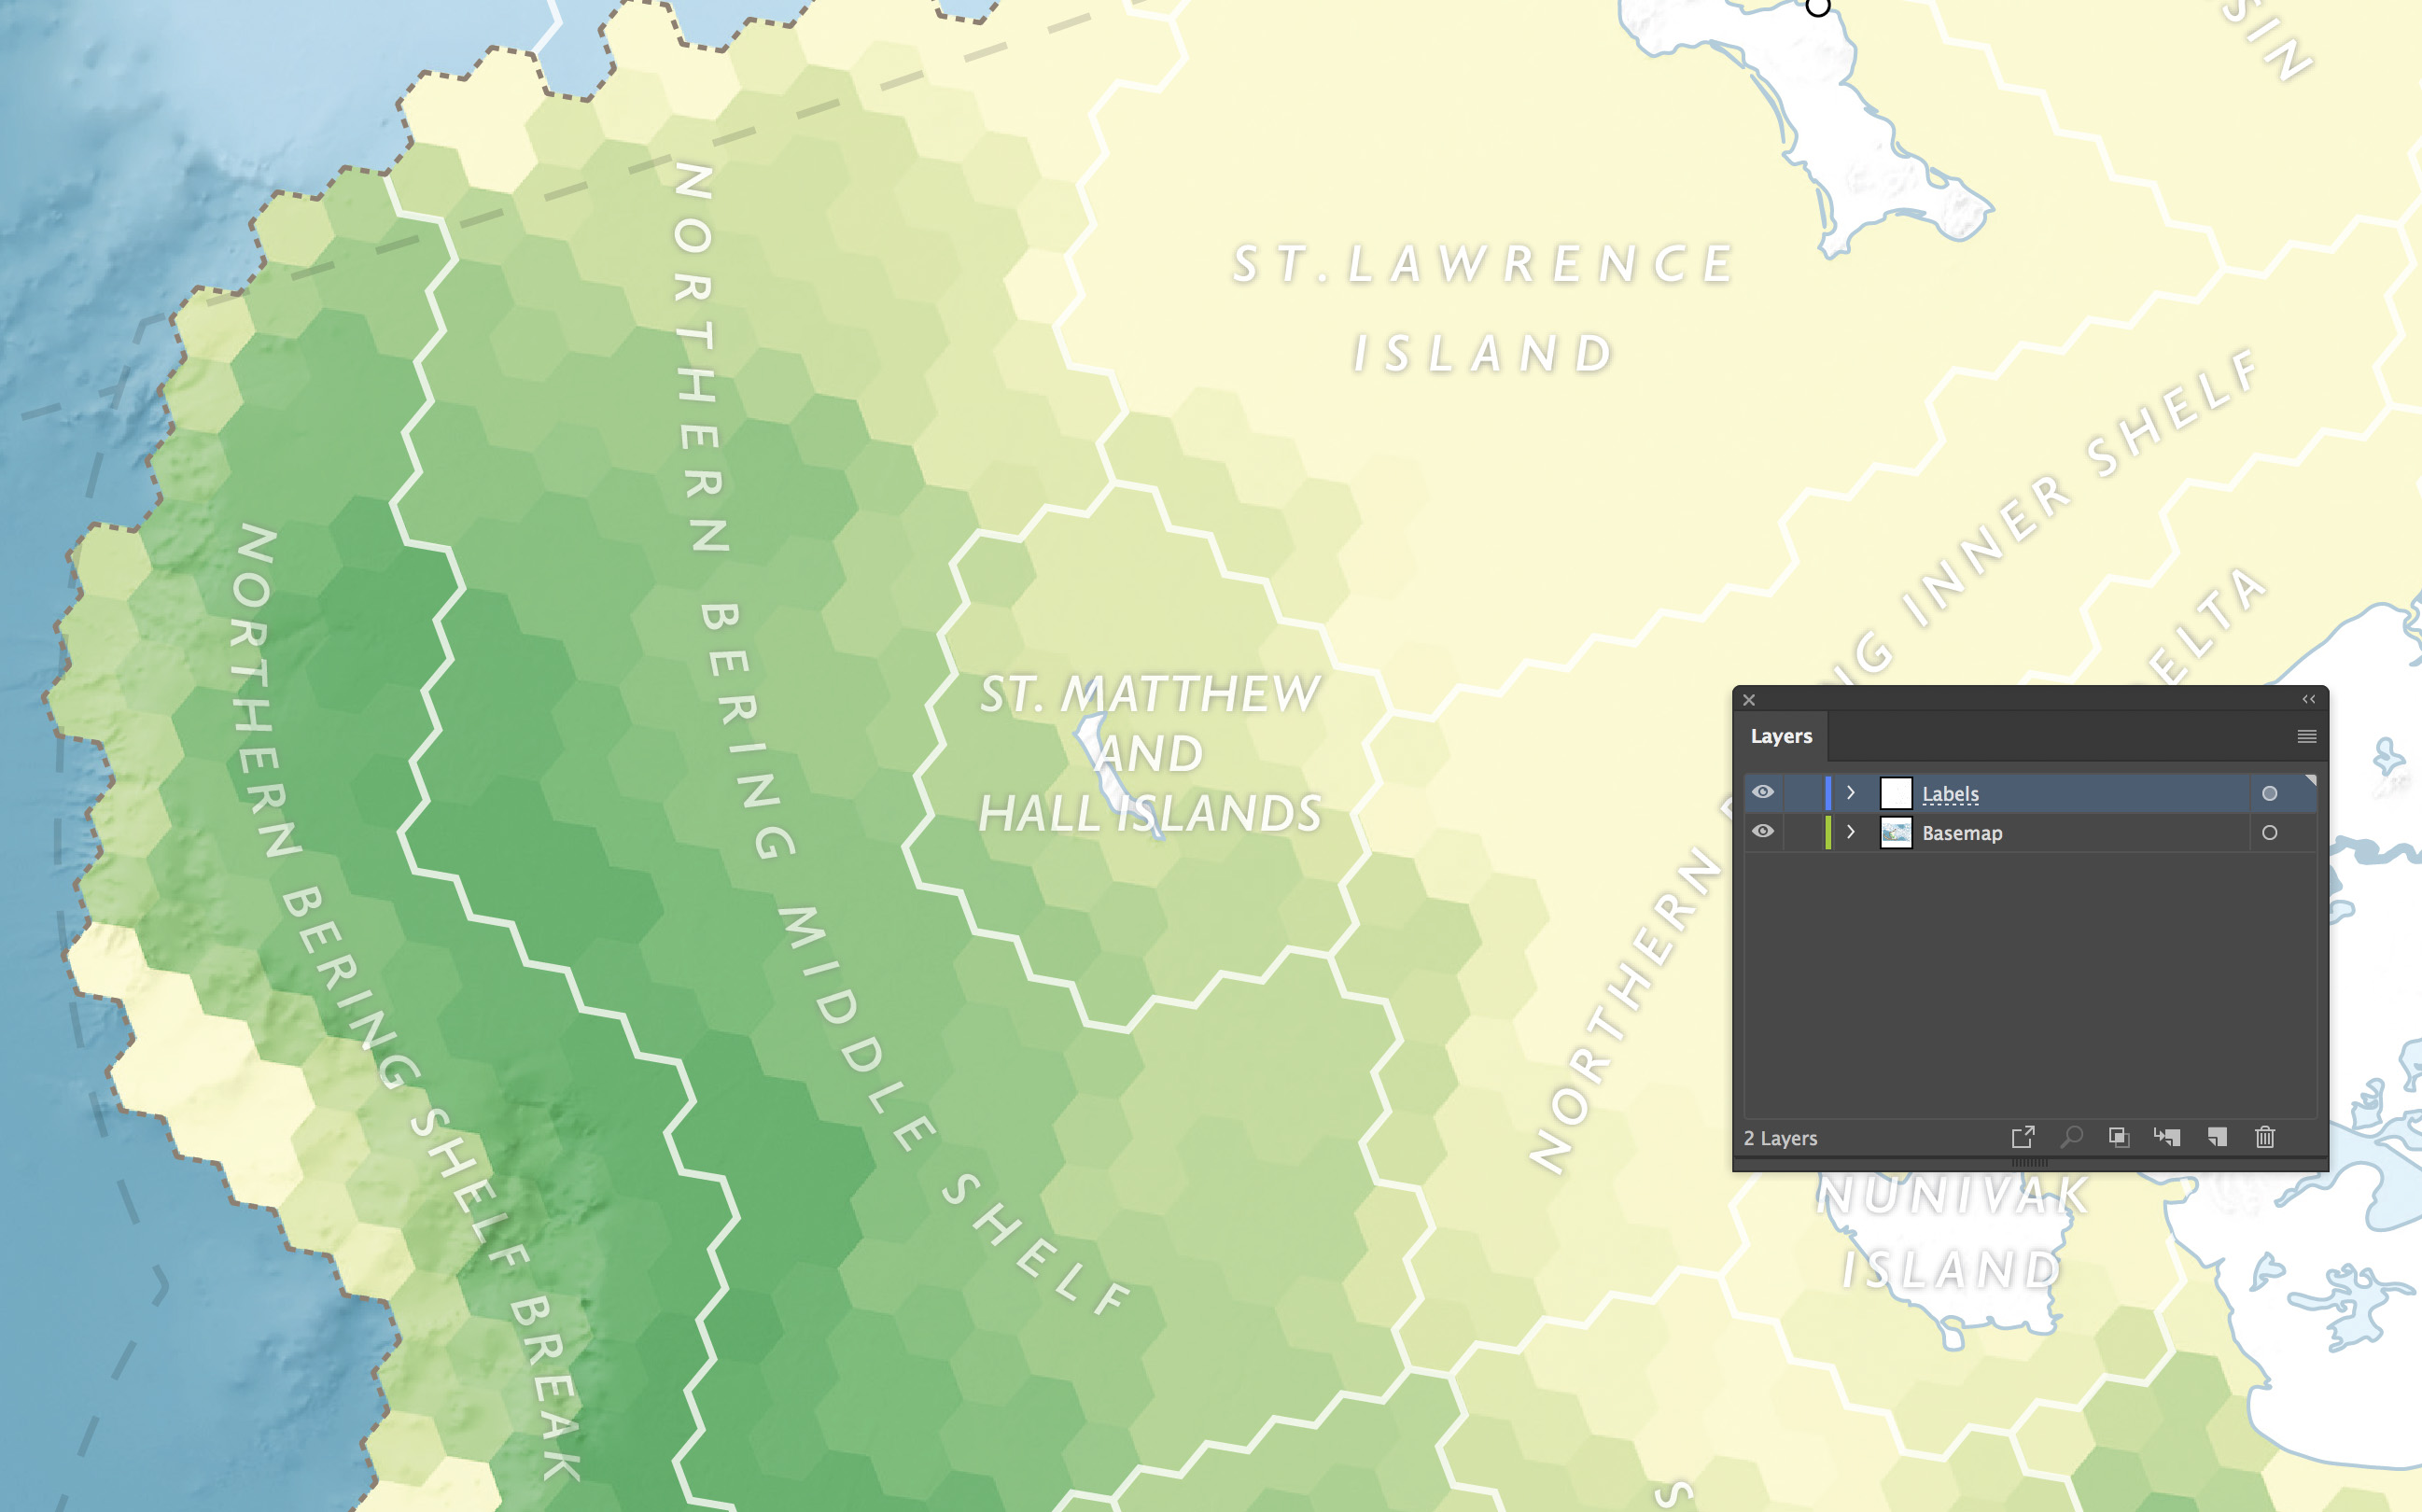
Now the label for Lake Missaukee has a glow around it, but it’s not really necessary. It looks a little silly, and/or heavy-handed. A needless intervention.
So, how do we make these variable label halos, that fade in and out as needed? Well, that depends on what software we’re working in. Let’s start with Photoshop.
In Photoshop
Let’s start with a map, and some labels. You might have imported these labels (and/or parts of the map) from Illustrator, or perhaps you made the whole thing in Photoshop. It doesn’t really matter. Here’s my starting setup, though. For simplicity in this demonstration, I have a basemap layer, and a labels layer.

To start, I’m going to need to make a copy of the Labels layer. Click on the it (in the Layers panel) and drag it down to the bottom until you’re hovering over the icon that looks like a plus sign in a square. This is the Create New Layer button. Release the mouse and you’ll have a copy of your layer.

You can double click directly on the name of one of these layers to rename it. Call the topmost one “Labels” and the bottom one “Glows” (you can also click and drag group in the Layers panel to re-order them). Then, turn the Labels layer off by clicking on the eyeball icon to the left of the group name. We’ll be setting this aside until later.
Now I need to make some nice glowing halos. I can do that selecting the layer that contains my labels, then clicking on the fx icon found at the bottom of the layers panel, and choosing Outer Glow.

There are a lot of settings here — probably more than you’d need in most situations. They’re all worth playing around with to understand, but for simplicity, let’s focus on just a few.
First, note that I am making my halos pretty strong—much stronger than I would be under normal circumstances. This is to make sure you can see what I’m doing. Once you go through the tutorial, you may well want yours to be fainter in the future.
For color I’m going to go with a white halo, set at 100% opacity, so that my glow simply whitens up my map a bit. And if it’s not already set, the normal blending mode is probably called for here, so that I don’t have this white color blending into the map in unexpected ways.
The size slider controls how far from the type your halo will extend, and the spread slider controls how soft and fuzzy its edges are. The settings you see in my example above are not likely to be the best settings for you. This is something you need to experiment with — there’s no one-size-fits-all sort of answer that I can give you. The overall goal is to make something that’s effective, but subtle. It should give the labels a boost, but not be too noticeable on its own.
Next up, it’s time to start making things fade in and out. Select the Glows layer and then go down to the bottom of the Layers panel and click once again on the fx button. This time, choose Blending Options.

Have a look at the Blend If section. Here, we can tell Photoshop to change the transparency of our Glows layer based on how light it is, or how light the layer underneath it is. Blend If is pretty powerful, and if you’re interested in a more detailed exploration of how it works, check out this video.
Basically, we’re going to use this panel to tell Photoshop the following: “Whenever the Basemap layer is light, make the Glows layer fade out.”
On the bottom gradient, titled “Underlying Layer,” click on the white triangle and drag it to the left a bit. Notice how the glows start to break up and disappear.

Based on the particular settings I have up above, I’ve told Photoshop: if the underlying layer (the basemap) has a lightness of 184 or higher, make my glows layer go away. Now, that’s sort of working for us, but we need to refine it a bit. It’s great that the glows go away in the lighter areas, but it would be nice if the transition was smoother, so that the glow was more proportional to the lightness of the basemap, instead of just being a binary yes/no decision.
Holt Option (or Alt on a PC) and click on the white triangle. Notice how it splits. By dragging either of the two halves, we can more finely control the transparency of our glows.

In the example above, I’ve set it so that the glows are totally visible up until the basemap reaches lightness level 70. And then the glows start fading out until they become invisible, which happens when the basemap is lightness 255. These numbers, again, are just for this example. Yours will need to be adjusted to whatever map you’re using. Play around with the sliders to see what works as a starting and ending point for your glow fades.
One problem remains. Our labels are also fading in and out, not just the halos around them.

And this is why we made a second copy of our labels. Turn those back on. They’re untouched by the effects we’ve applied and remain solid, so they cover up the fading labels beneath. Now we have solid labels and fading glows.

From here, you may wish to make some further tweaks, either editing the glow effect, or the Blend If. But the basic idea is now in place: the labels receive more help where they need it, and the glows generally get out of the way when they are useless.
Credit: This tutorial used to be based on an entirely different method, using opacity masks. But a helpful comment from Rolf Rosing (seen below) suggested that I try the Blend If method, and so I’ve updated things to use that. It’s a much simpler and easy-to-adjust technique. Thanks, Rolf!
Bonus content: This is a good time to show off a cool feature in Photoshop, even though it’s one that’s unnecessary in my particular example. Turn Labels layer back off for a moment, and then select the Glows layers. Right above it on the Layers panel you’ll see an option marked Fill that’s set to 100%. Set that to 0% instead. What this does is get rid of the layer’s main artwork (the labels), while still keeping the glow on the labels. The fill setting is almost exactly like opacity, except it doesn’t operate on any layer effects (like glows). The opacity setting, on the other hand, will make both the labels and the glows get more and more transparent.

So now you’re left with just the glows, and then you can turn the Labels layer back on. Again, this is totally unnecessary in my example situation, because the labels in the Glows layers are hidden by the solid labels in the Labels layer, so there’s no need to hide the former. But, this could be handy if you wanted a Labels layer that was semitransparent, and you didn’t want it affected by the labels fading in and out in the Glows layers underneath.
In Illustrator
Now, if you don’t happen to be working in Photoshop, fear not! This same idea works just fine in Illustrator, which also has the ability to create both glows. This time, though we’ll use an opacity mask to control the glows.
Once again, let’s set up a map and some labels. And this time, I’m going to invert things: I’ve got light labels that need a dark halo, rather than the other way around.

I’m going to click on the small circle next to my Labels layer to target its appearance (if you want to know more about appearance attributes in general, I recommend taking a detour and first reading The Power of Appearances, another Illustrator tutorial I posted on here some time back). Then I’ll go up to the Effects menu and choose Stylize → Outer Glow.

There are far fewer settings on the Illustrator version of the Outer Glow (I appreciate that simplicity). Again, they require a little messing around to find the exact look that’s best for your map, so I can’t tell you what to pick. One piece of advice: by default, the blending mode is usually set to “Screen,” which is likely not what you want. I don’t want to get into the mysteries of Adobe’s blending modes, but I’ll simply say that Screen is generally for lightening underlying things. In this case, we want a dark glow, and so if you set the mode to Normal, you’ll get a result that’s probably more in line with what you were expecting.
I’ve set my glow to 45% opacity, a black color, and a 0.5pt blur, and this seems to be enough for my labels to stand out against the lighter areas of the underlying map.

This time, for demonstration purposes, we’ll do things in a bit different order. I’m going to modulate the glow’s opacity, and then I’m going to create a separate, untouched version of the labels. It gives me a chance to show you a couple of other useful things.
To make the glows fade in and out, we’re going to use an opacity mask. We’ve worked with these before, if you’ve been following along with my other tutorials. If not, go check out the Opacity Masking section of this tutorial before proceeding, which will explain the basic concept.
In the case of my example map, I’ve got a bunch of hexagons and other stuff in my basemap layer. I’ll copy everything in that layer to the clipboard. Then, I’ll once again target the appearance of my Labels layer by clicking the small circle next to the layer name. From there, I’ll open up the Transparency panel.

Hit the Make Mask button. We start with an all-black opacity mask, which means: hide everything in this layer. Uncheck the Clip box — this (annoyingly default) setting tells Illustrator: hide everything that falls outside of the bounds of the artwork we have inside our opacity mask. Since we have nothing inside in our opacity mask at the start, everything on our map counts as “outside the bounds of the artwork inside the mask” and is hidden. Unchecking the box turns out mask white, so everything shows up again.

Alt-click on the mask (the white rectangle on the right) to go inside. Then go to Edit → Paste in Place to drop our basemap in at just the right location.

The light areas of our mask are telling Illustrator: make the corresponding areas of the Layers label opaque, and the dark areas of the mask are telling it to make the corresponding areas of the Layers label transparent. This is exactly what we want: our dark glow should be strongest when the basemap is lightest. However, if you were in another map situation in which you wanted to put light halos on a dark background (as we did in Photoshop, above), this wouldn’t work. You’d want those light halos to only show up when the basemap was dark. That’s why the handy Invert Mask button is there. If you clicked that, the light areas in the mask switch to mean “transparent” and the dark ones become “opaque.” But, that’s all hypothetical. In our case, we already have exactly what we want, so I’m going to leave the butotn alone.
Alt-click on the box to the left of the mask in the Transparency panel to go back to the map. Once again, our glows now fade in and our as needed. But, so do our labels.
We need, once again, an untouched copy of our labels to go on top. As with Photoshop, you can duplicate the Labels layer by clicking and dragging it to the icon on the bottom of the Layers panel that looks like a plus sign in a box (note in my screenshot it looks like an upturned page, instead; this is from a slightly older version of Illustrator). Rename/reorder so that there’s a Glows layer on the bottom and a Labels layer on the top.

Now, both layers are presently masked. We want to get rid of both the glow and the mask on the top, Labels, layer, so that it’s just a layer of plain, unadorned labels. Target the appearance of the Labels layer (again, click that little circle) and open the Appearance panel. You’ll see that the layer has an Outer Glow on it.

If you click on the words Outer Glow, you can go and change your glow settings. That’s handy for later on if you need to make adjustments. But we’re not working with our Glows layer, we’re working with our Labels layer, so I really want to just get rid of this spare glow. Click to the right of the words Outer Glow to highlight the effect (don’t click on the words, just next to them). Then, click the trash can icon at the bottom of the Appearance panel. That glow will be removed.

Keep targeting the appearance of the Labels layer and go to the Transparency panel next. Here, we can see that we still have an opacity mask in place. Hit the Release button.

This unfortunately doesn’t just get rid of the mask. It actually takes all the contents of the mask and dumps them back on your map. So now I have two copies of my basemap: the original, and the one that used to be in the mask. We need to delete the latter. In the Layers panel, expand the tree to see what’s inside the Labels layer. Notice that the first thing there is a Group.

That’s got all the stuff that used to be in the opacity mask. Select and delete it. And now we’re back to just a simple Labels layer, with no fancy effects. It sits atop the Glows layer, and hides the fact that the Glows layer labels are fading in and out. With that, we’re all set: we have white labels that get a little dark glow behind them when they need it. The glow fades away when it’s less useful.

Again, this would have been easier if I’d just duplicated the Labels layer before applying a glow and opacity mask, but I wanted to show you how to alter/remove those things later. And now you know how to adjust your glow using the Appearance panel, if you decide it’s necessary.
So, that’s how to make glowing type halos in Photoshop and Illustrator that respond to the basemap underneath. It’s a subtle touch. It’s not something I do all the time, but it’s a handy tool to bring out when it can help. Enjoy!
This tutorial is, and will remain, free, but if you derive some value from it, you are welcome to make a donation to support my continued work.

In Photoshop, you could use the ‘blend if’ sliders to hide the glow in lighter areas of your map. The sliders are found in the ‘blending options’ menu on the left side of the layer style (effects) window: if you option click the white triangle on the lower (underlying layer) slider, it splits. When you slide the two parts across the bar, you will see the glow disappear when it is over a light part of the map. You can tweak it, and have the glow automatically appear/disappear without the need of manual masking the glow. So it stays live and updates if you move the label across the map!
Thanks for all your tutorials, I’m learning a lot and getting much inspiration!
That’s an excellent point. I’ve messed around just a little with those sliders, but hadn’t thought about applying them to this particular situation. Thanks!