Previous Chapter: The Sun
Vertical Exaggeration
One decision when making in a shaded relief, whether it’s done in Blender or elsewhere, concerns how much vertical exaggeration to apply to the terrain. The Earth is actually quite smooth, and so we have to make the mountains higher and the valleys lower than they really are if we want them to show up. Right now, I can see the terrain fairly well in my rendered relief, but if you want to make adjustments, remember that you can select your plane, then head on over to the Shader Editor and adjust the Scale parameter on your Displacement node.
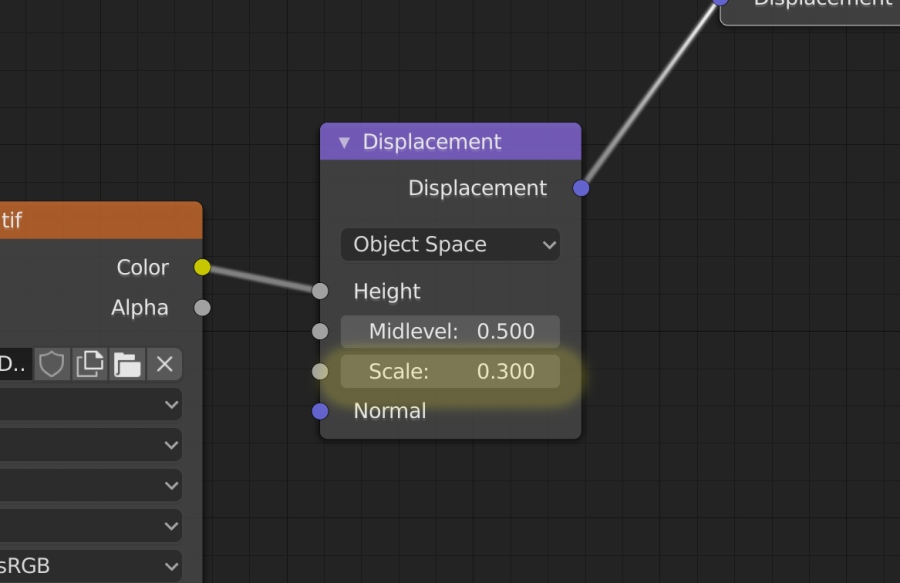
Earlier, I decided to go with 0.3, but feel free to play around with the number and see how it affects things. This is basically a multiplier that gets applied to the heightmap you feed into Blender. So, you may need to adjust this number a fair bit depending on the heightmap you are using. Experiment around and find something you like.

I’d recommend a light hand with this parameter. You want the terrain to be strong enough to be perceptible, but not overly exaggerated. The more you exaggerate it, the darker the shadows can get, and that can potentially mean a loss of detail.
Note that keeping the Scale value at 1 doesn’t mean that there’s no vertical exaggeration. By the time you get your data into Blender, all spatial information has been lost to the ether, and it would be tough to calculate the relationship between the vertical and horizontal scales. That’s not usually of any concern to me, as I’m just eyeballing the exaggeration factor until it looks good. It’s likely that any relief you make will have some degree of vertical exaggeration. The real-world Earth is just too smooth for most cartographic purposes.
Adjusting Render Settings
We’re closing in, but there are still some more things to adjust before we’re done.
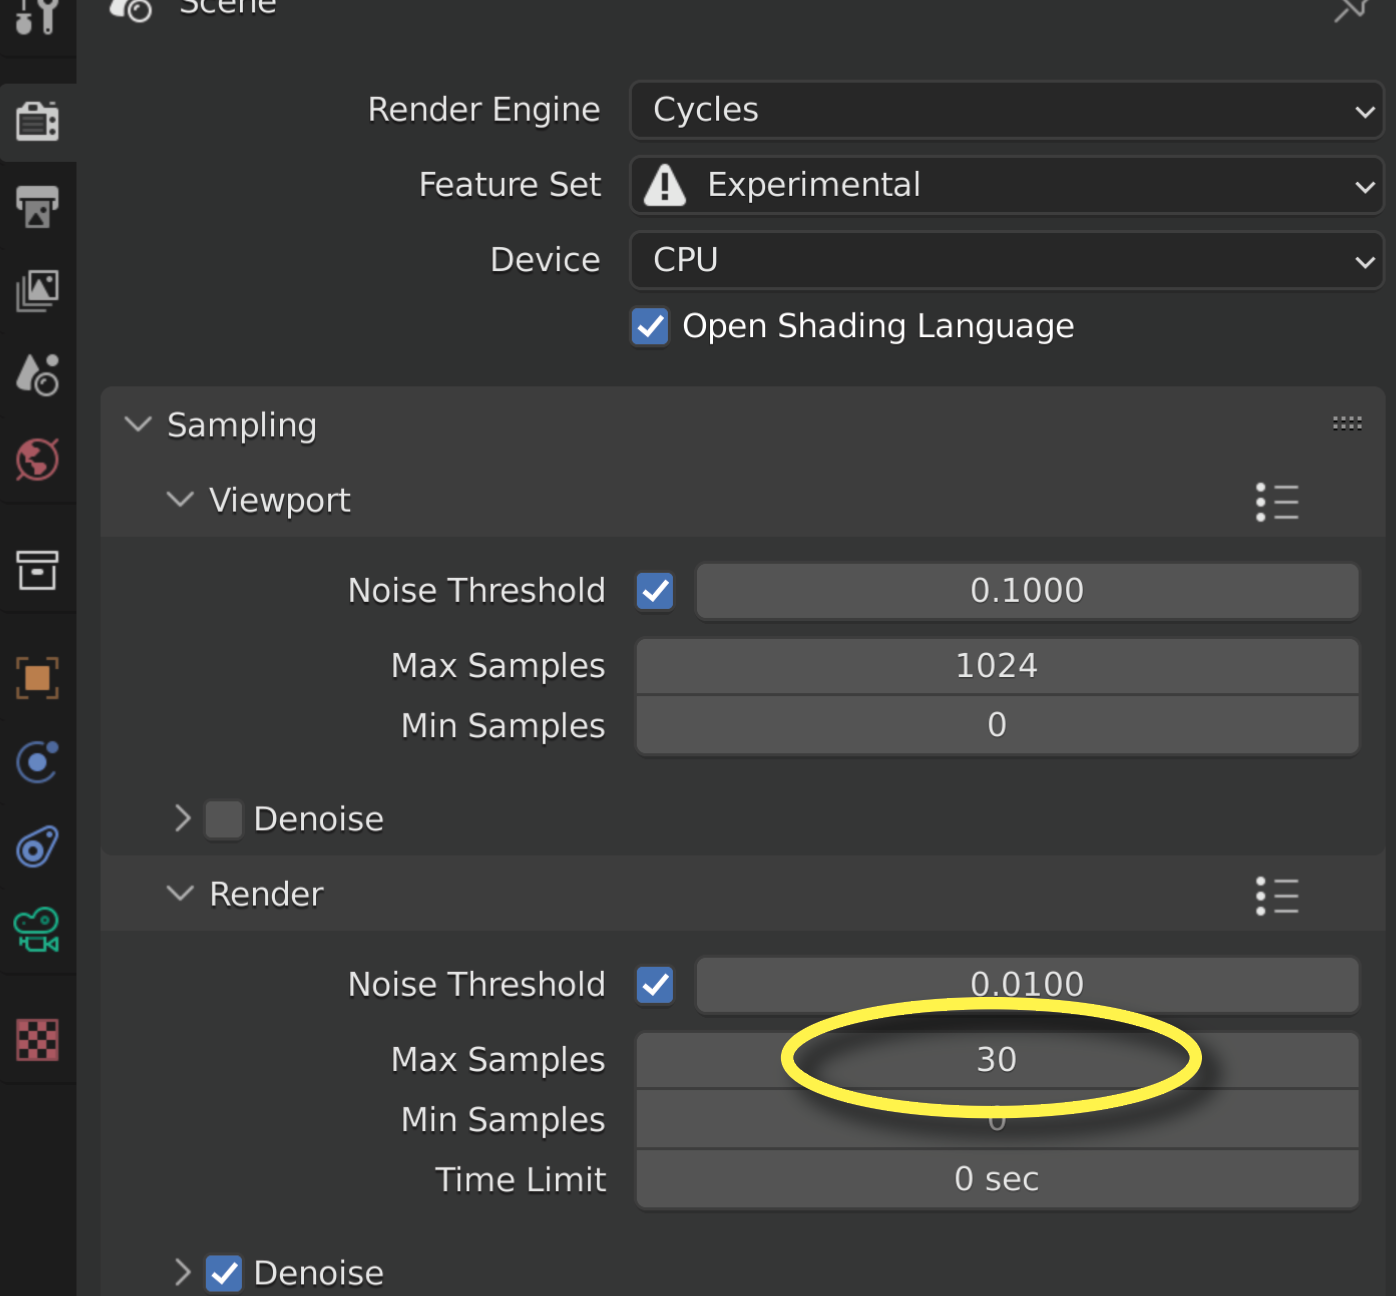
First, I’ll draw your attention back to the Render Properties, and the sampling settings. Again, you can get there by clicking that grey camera icon. Have a look at the sampling settings for your final image. You might want to crank them up some for a smooth final result.
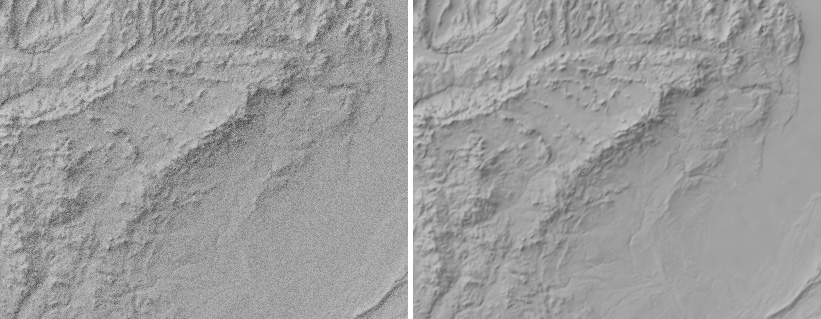
To reduce the number of render samples that you need, Blender offers Denoising. You’ll see that there’s a Denoise box already checked. That setting applies some filters once your image is done rendering, and it removes small artifacts and, well, noise. This means we can now get away with faster renders that use fewer samples, and then get cleaned up at the end by denoising filters. Here’s the difference it can make:
So, you now have two ways to get a smooth render: crank up your render samples really high, or keep things coarse and grainy, but then run noise reduction afterwards. The latter is faster, so I’d recommend keeping it on. Denoising works very well, and I haven’t seen it introduce any weird artifacts. I often do test renders at about 10 samples, and then a final render at about 50. Prior to denoising being introduced, I had to go up to about 300 samples to get a good result, which took a long time!
Linear Heightmap Interpretation
We’re almost done changing settings, pulling levers, and adjusting dials. There’s one last one, and it’s one that escaped my notice for the first five years that I used Blender.
Select the plane, go to your Shader Editor, and have a look at your Image Texture node. Change your Color Space from sRGB to Non-Color.

In Blender, the Image Texture node is often used to apply literal images to things. I gave the example before of using a picture of wood grain to make something look woody. But we’re hacking things and using the texture to communicate height information. So we need to tell Blender that our image has no color information and to linearly convert each pixel in the heightmap to a displacement. If we don’t, it will apply a color correction curve, instead, and a heightmap pixel that is, say, 50% grey, won’t necessarily be half as tall as the white areas. Setting it to Non-Color makes it function more sensibly: the height of each pixel of terrain is always in exact proportion to where it falls on the white-black greyscale ramp. Notice the different it makes.

With the sRGB setting on left, a lot of lowland areas are flattened out and the peaks are exaggerated. The Non-Color setting on the right preserves those details correctly. This is a critical setting to get right, or Blender will interpret your terrain wrong and artificially flatten out your lowlands.
I was going to tell you about this setting a while ago, but I held off because (1) I wanted to reduce the number of settings you had to tweak before you actually started making real relief, and (2) I discovered this later and didn’t want to update all the screenshots to show what it would look like with the new relief. By this point, I figure it won’t bother you too much to know that the last few screenshots in the tutorial have the flatter relief.
Final note: This setting seems gets reset almost every time you load a new heightmap in, so you’ll need to remember to update it each time you make a relief of a new area.
Saving the Relief
Now that all the settings are tweaked, we can do one final render that we’re happy with. Now is a good time to crank up the number of render samples, and you might also want to scale the render size back up. If you remember before, I went to my Output Properties (the grey icon that looks like a photo coming out of a printer) and set my output size to be 50% of the size that I wanted my final image to be. Now I could go back in and crank that up to 100%, if I’m thinking this will be the final image I render.

Once you’re set with that, go to the top menu and once again choose Render → Render Image. It might take a bit to produce this higher-quality image, but hopefully the results will be worth it. If, at any time in the render process, you decide you want to bail out and stop it from finishing, just hit the Escape key.
After it’s done rendering, we need to save our relief. Go to the top menu bar of the render window and choose Image → Save.

You’ll be taken to a file browser where you can choose its name and location. On the bottom left, under Save as Image, you can also choose your file type, bit depth, and color mode.

Here, since I have only a greyscale image, I could probably choose the BW option to save without color, and make my file a little smaller. In any case, once you’ve got those settings to your liking, you can hit the Save as Image button way up in the upper right, and then you’re done!
Repeating the Process
Now, that all probably took you a really long time, but there’s some good news: you’ll never need to do most of this stuff again. Go up to the top menu and choose File → Save — hopefully you’ve been doing this at intervals all along. Once you’ve got your Blender file saved, you can re-use it any time you like.
When it comes time to make a brand new relief, you just need to follow an abbreviated set of steps, since your studio is mostly set up already.
- Change the dimensions of the plane to match the aspect ratio of your new heightmap.
- Edit your output dimensions in Output Properties, so that the final image matches your new heightmap.
- Edit your camera’s Orthographic Scale to match your new plane dimensions.
- Go to the Shader Editor and choose your new heightmap file.
- And don’t forget to change your color space back to Non-Color if Blender tries to reset it to sRGB.
You might also want to do some test renders while you tweak your vertical exaggeration (the Scale value in the Displacement node) or maybe your lighting. Before doing that, you could speed up the process by shrinking your output image, and/or by lowering the number of render samples; put everything back to full strength when you’re happy.
So, despite how long your first relief took, your next one can be ready to go in minutes!
Tutorials like this take a surprising amount of time to develop and maintain. This tutorial is, and will remain, free, but if you derive some value from it, please consider a donation to support my continued work.
Next Chapter: Advanced Thoughts
